RAM or Random Access Memory is essential for the performance of a computer. Without enough RAM, programs or even applications don’t work as they should.
They perform slower or can crash while you’re in the middle of doing something like playing a game if you have critically low RAM available.
Don’t you hate it when that happens? Imagine that you’re playing something, and your graphics are starting to lag in the middle of it. What to do then?
The best course of action for you at that moment will be to learn how to allocate more RAM to a game.
Keep reading this article, and you’ll find out exactly how you can do that.
- What Is RAM?
- What You Need to Consider Beforehand
- How to Know How much RAM is There in Your Game Currently?
- How to Allocate More RAM to a Game
- #1: Setting a Higher Priority
- #2: Find the Memory Reserve Setting
- #3: Disable Background Applications
- #4: Disable Unwanted Services
- #5: Increasing Virtual Memory for a Better Management of Memory on Windows 10/11
- #6: Using Settings
- #7: Close Some Programs Eating up Too Much Memory
- #8: Use Command Prompt
- #9: Upgrading RAM
- Conclusion
What Is RAM?

Random Access Memory is the abbreviation of RAM. And Ram is a computer memory that you can reach randomly.
This means that you can keep and retrieve data in any order you like. Computers use RAM so that they can store data that is currently being used by the computer’s system.
If you were to allocate additional RAM to your game, you are giving your particular game more memory that it can work with, which in turn will improve your game’s performance and slow network.
When your personal computer has extra RAM, your PC can process a variety of tasks all at once and even complete them quicker because of extra ram usage.
All of the tasks that your computer has to perform don’t get processed in succession, but rather sequentially.
What You Need to Consider Beforehand
Before you learn how to allocate more RAM to a game, you need to keep a few things in mind.
Firstly, you have to ensure that the computer that you’re using has enough RAM before all else. If you are allocating RAM to any game, you might want to ensure that you have at least double the RAM memory your game needs.
Secondly, you have to consider the RAM of your graphics card and how much RAM it has. You need to leave room for your graphics card if it has dedicated memory.
Thirdly, you have to consider all the other programs that must be running while you play your game. If there are other programs that are taking up too much of your computer’s RAM, there might be an interference with the performance of your game.
Finally, you have to make sure that you’ve got the best drivers for your internal hardware and graphics card.
It can be a problem if you have outdated drivers as some of the problems will be caused to your games as well as other programs.
Now, you may be asking yourself, how much RAM do you actually need for gaming? It can depend on your game as well as the specifications of your other systems.
But, as a general rule, I would recommend getting at least double the RAM than what your game needs.
So, for instance, if your game needs about eight gigabytes of RAM, you should allocate at least sixteen gigabytes o RAM in your system. You can get as much RAM as you like.
As outdated drivers sometimes cause problems with programs and games, you should get the latest drivers, which you can find on the Windows Update or the website of the manufacturer.
How to Know How much RAM is There in Your Game Currently?
Before you move on to doing anything else, you need to identify how much RAM is assigned to the game that you’re playing currently.
To get to know that, you have to open Task Manager while the game still runs. Go to the Processes tab, where you’ll find your game’s entry, and check the column named Memory Usage. You’ll find out how much RAM your game has from here.
How to Allocate More RAM to a Game
There are a lot of paths that you can take to more RAM allocated to a game. You can either limit and control the memory consumption of your background applications or, using the execution method, set your game as a priority.
You could also check your operating system’s RAM and scan with the Windows Memory Diagnostic Tool if there are any problems.
Usually, you don’t have to allocate more RAM to a game if you have enough free memory for running a program.
However, often times there is not sufficient RAM. If you’re having issues with RAM throughout your whole system, you should optimize RAM to fit your memory usage.
You can follow the easy steps down below to allocate RAM to your game to make sure it performs better.
#1: Setting a Higher Priority
You can go to Task Manager to set the priority of your game high or even low while your game is still running.
Even though the performance of your game depends on the speed of the RAM, this can be very useful while you’re multitasking.
For instance, it will take a lot out of your RAM while you use your browser to download something.
If you set that to a lower priority, then you can do other things like playing games seamlessly without having to encounter any lags.
- To set a priority, you have to keep the application like your game running. Then, you have to minimize the program or your game to head over to Task Manager.
- You can go to Task Manager by just clicking right on your taskbar, or you can just search it in the Window search box. The easiest way is to press Ctrl + Shift + Esc.
- Now that you’ve brought up Task Manager, use your mouse cursor to click on the Processes tab.

- Give right-click on your app and click on Go to details.
- You have to choose the app again from that Details tab and right-click as well as select the Set Priority.
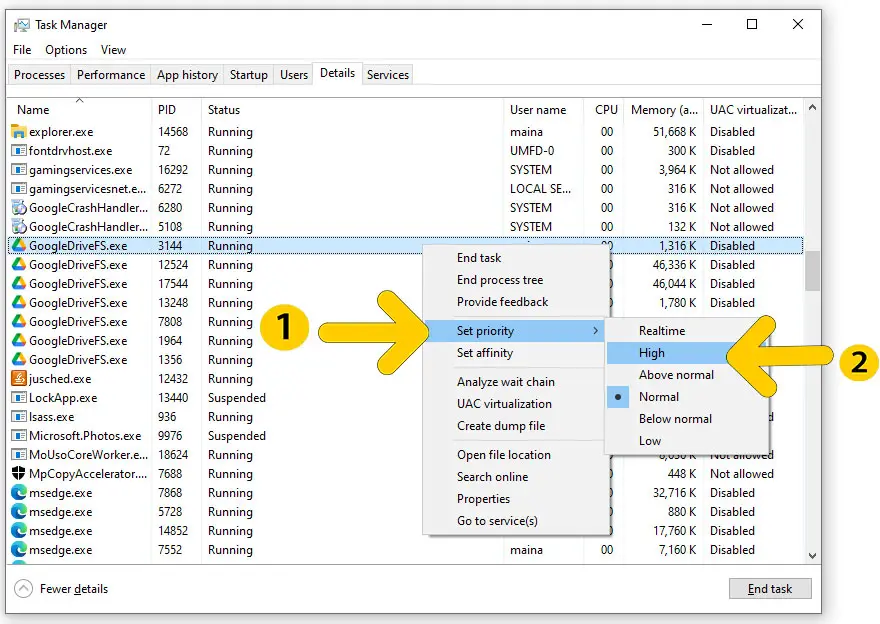
- If you need to allocate more memory, you have to set the priority of your game to high or even real-time.
- If you need to allocate less memory, you can set the priority to a low.
- You have to remember that setting the priority isn’t something that you can only do once. You have to do it each time you launch your game and need to allocate more RAM.
And, if your CPU is at a usage that is maximum, you should assign more core to your game of CPU.
You can do that by selecting CPU cores from Set Affinity. And, you should choose only CPU 0 if you want the other apps to shine or choose all to dedicate RAM so that the game has more RAM.
#2: Find the Memory Reserve Setting
There is much software, rendering software, and specially designed software that has its own settings that you can use to control how much RAM is allocated for your application.
- For instance, a lot of Adobe applications, such as Adobe Premiere Pro, have these kinds of settings.
- To access these, you have to go to the Edit tab. From there on, you have to go to the Preferences tab, which will lead you to the General tab. Then go to the Memory tab from there to set the RAM.
- For best performance, you can set it to low. You need to get a memory reserve that is higher if you need to multitask.
In many software, you can find these settings on different labels that you can use.
#3: Disable Background Applications
If you find out that there is a low amount of RAM free in your computer even though you’re not juggling other applications at the same time, it could be that your background applications are taking up too much of your memory.
So, if you want better performance overall, you should turn off these background applications at the cost of irregularly slower indexing or launching time.
You can easily disable your background apps if you were to just search for Background apps in the search bar of Windows.
Here you can select which applications you want to be running in the background, or you can completely turn off all background applications altogether.
You could also choose unwanted applications from your Task Manager. Just click right on your mouse on the apps, and you can disable them like this.
#4: Disable Unwanted Services
Usually, there are a lot of services that run on your computer just because you installed an application or for other reasons that eat up a lot of the memory in its process.
Using the system configuration feature, you can disable these unnecessary and unwanted services to get much more improved performance.
Just remember to not disable all the services that are actually important for any application to run that is necessary.
This way, you can get more memory space on your computer. To do so:
- To launch a Run prompt, press the Windows key and R simultaneously.

- Now, you have to type in MSConfig before hitting enter.
- From there on, you have to go to the Services tab, where you can see all the services that are running.
- Now, you have to check the ‘Hide all Microsoft services’ that is situated on the bottom so that you don’t disable any important services by accident.
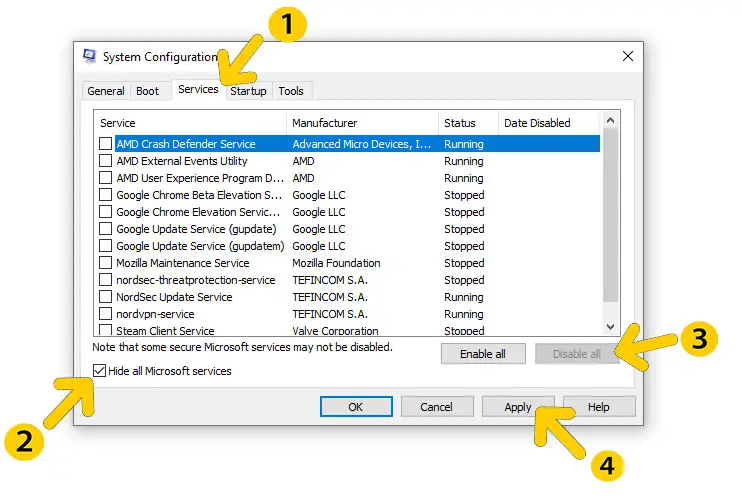
- You can uncheck the unimportant services. If you wanted to, you could choose to Disable all the services, but I wouldn’t recommend it.
- Now, all you have to do is click on Apply and then on OK.
- The last thing that you need to do is restart the computer.
If you clear the running services that are not necessary, you’ll save a lot of memory that can lead to important programs running without any lags.
#5: Increasing Virtual Memory for a Better Management of Memory on Windows 10/11
Virtual Memory compensates for the shortage of physical memory on the computer. For increasing the memory of your RAM, page file memory or Virtual Memory transfers data to disc storage from RAM temporarily.
You can use these methods to increase the virtual memory of your computer.
- Deleting Unimportant Data
- You have to follow these simple steps to delete unwanted files.
- Firstly, you need to look for ‘Disk clean up’ in your computer’s taskbar.
- Select open.
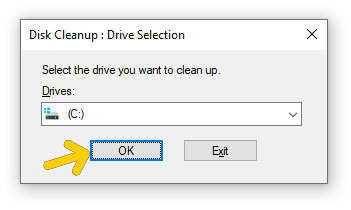
- Then you need to choose the drive that you want to clean.
- Now, click on ‘OK.’ Then wait till the computer shows you the folders.
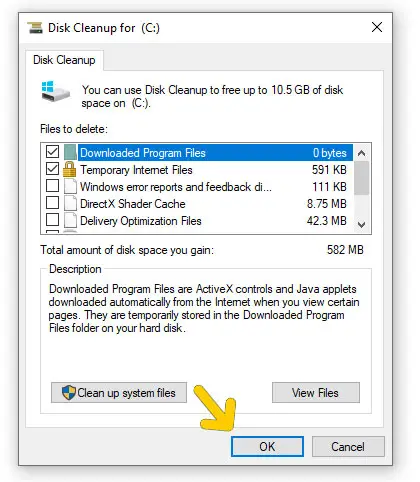
- Then, a tab will appear. You have to choose the files that you want to delete or clean up.
- Click on the ‘Clean up drive’ so that you can finish this task.
I would recommend that you back up your important data and files before you delete them.
#6: Using Settings
To adjust the Windows 10/11 virtual memory, you need to follow these steps.
- You need to open ‘settings’ from your Windows taskbar.
- Now, choose the system.
- You need to click on ‘About.’
- Now, you need to choose the ‘System into,’ which is situated under ‘related settings.’
- Then, you need to click on Advanced system settings, which is situated o the left side.
- Now, select the ‘Advanced’ tab.
- Then you need to click on the ‘Settings’ option, which is situated under ‘Performance.’
- Then click on ‘Advanced’ again.
- Now, you need to choose the ‘Change’ option.
- After that, you need to click on ‘Automatically manage paging files size for all drives.’
- You need to click on ‘Custom size’ now.
- Choose the paging files’ size that will be in megabytes.
- Then choose the ‘Set’ option.
- You need to click on the ‘OK’ twice.
- After doing all this, restart your computer, but don’t click on Reset.
By doing this, you can increase your computer’s virtual memory.
#7: Close Some Programs Eating up Too Much Memory
You can increase your virtual memory if you close programs that are running in the background and taking up too much memory. To do this:
- Press on Ctrl + Alt + Delete simultaneously.
- You need to select Task Manager.
- Go to the ‘Processes’ tab.

- You need to choose memory.
- Then you need to choose the programs that you would like to close.
- Select the ‘End Task.’
#8: Use Command Prompt
If you need to increase the virtual memory of your computer, you can do it using the command prompt.
- Firstly, open Start.
- Search for ‘Command Prompt.’
- Click right on the mouse on the command prompt.
- Now, click on the ‘Run as administrator’.
- You need to type in
wmic pagefile list /format:list
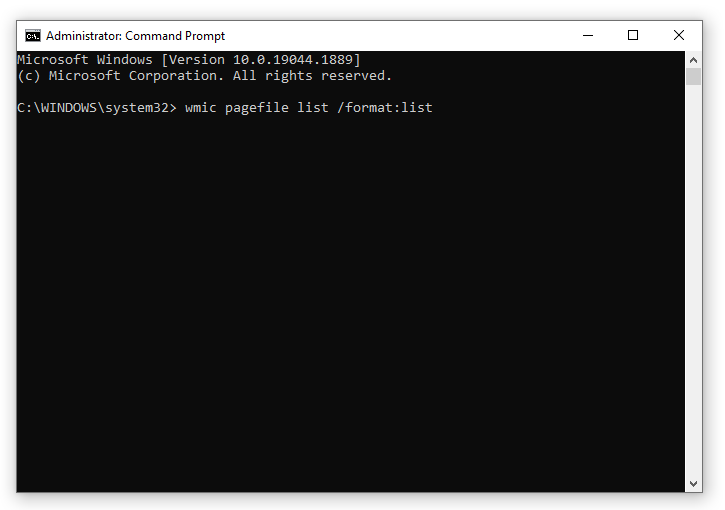
- Click on Enter.
- Type in another command.
- Then click on Enter again.
- Again type in another command and click on Enter.
- Shutdown
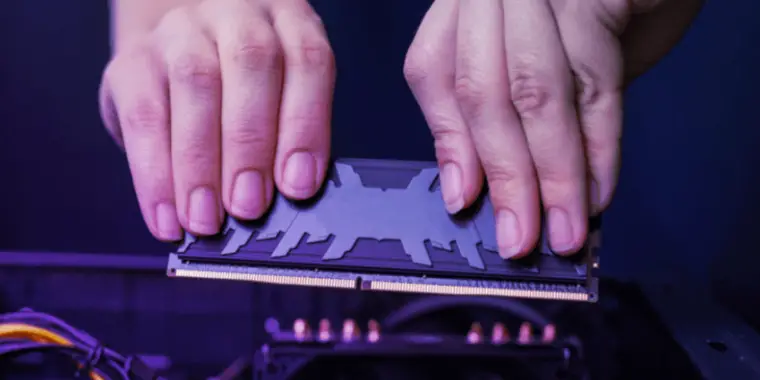
#9: Upgrading RAM
The last thing that you can do to allocate more RAM to your game is to upgrade your RAM or buy more RAM.
Learn more about the difference between DDR 3200 and 3600
If the physical memory of your computer is very low, such as 4GB, for instance, you should definitely invest in newer memory modules. That is if your motherboard has extra slots.
If your slots are filled, you can replace your memory stick with a new memory module as well. Performance tweaks are not going to be of much help if your RAM is low.
The good thing about memory sticks is that they are very inexpensive. Plus, they are a good investment as well. Just don’t download any RAM online. It’s a waste, and the website owners are robbers.
Conclusion
If you are having issues with your RAM, if you are short on RAM, which is causing your game to lag, you should learn how to allocate more RAM to a game.
With the methods that I showed you in this article, you can allocate more RAM to your game in Windows 10, 11, or even 8.
By allocating more RAM to your game, you can get a lot smoother performance out of your gaming without any lags as well.