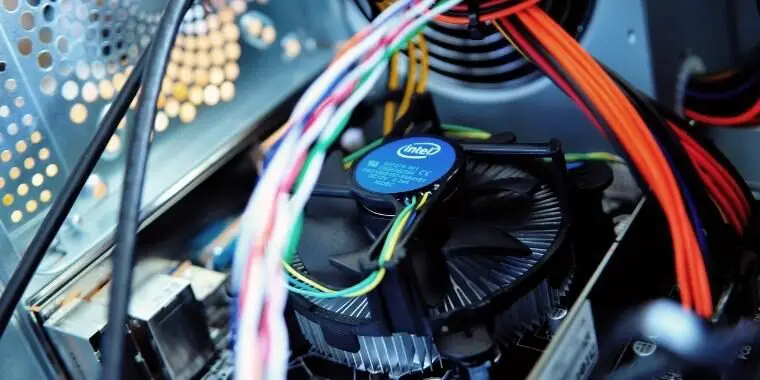
How to change CPU fan speed without BIOS? In this article, I’ll provide you with several solutions that worked for me in order to answer this issue.
BIOS is the easiest way to change most computer settings. However, there may be times when you don’t want to use the BIOS and need to change the fan speed frequently. For example, you have a computer that you use for both work and play, and you don’t want to restart it every time you start doing something else.
What are your options? Let’s explore them all!
How to Change CPU Fan Speed Without BIOS [Two Useful Techniques]

If you don’t want to use the computer’s built-in BIOS, you have 2 solutions that will work:
#1: You may install software that allows you to control the speed of your laptop fan. Speed Fan and HWMonitor are two well-known CPU fan control applications, but please check all 10 apps listed below to see which one is the best fit for you.
#2: You can buy and install external fan controllers that will help you to lower CPU fan speed.
Use Software That Controls The Fan: 10 Best Apps to Control Fan Speed
#1: Speed Fan
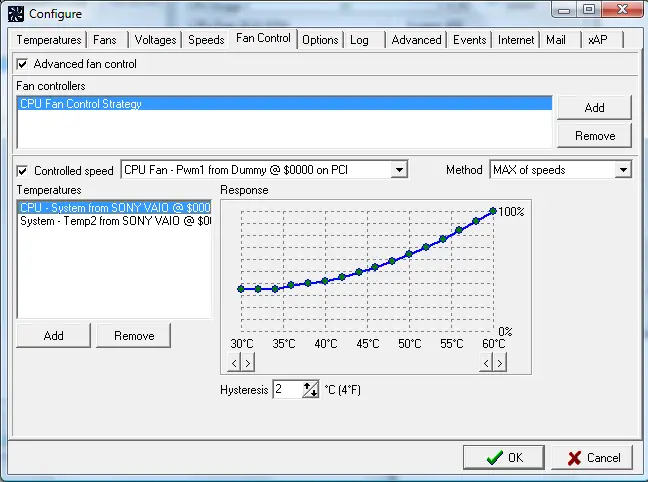
If you are wondering how to change CPU fan speed without BIOS then it should be your first choice. This free app was created to help users control their computer fans outside of operating systems. It allows them to get optimal performance when gaming or working on intensive tasks. If you set up SpeedFan correctly, it will be able to change the fan speed depending on the system temperature.
Although it is a very popular solution it may be a bit too complex for not-so-advanced computer users.
PRO Tip: When selecting parameters for the minimum and maximum fan speeds, take care to do it by hand and listen for noise. If you hear no sound from the fan, set its minimum speed at that value.
Steps to follow:
- Download SpeedFan from the official website
- Once the software is downloaded launch it and allow it to scan your computer
- Have a look at all the values you will see. SpeedFan will show you details about all your hardware including hard drive, motherboard, CPU, Fans, etc
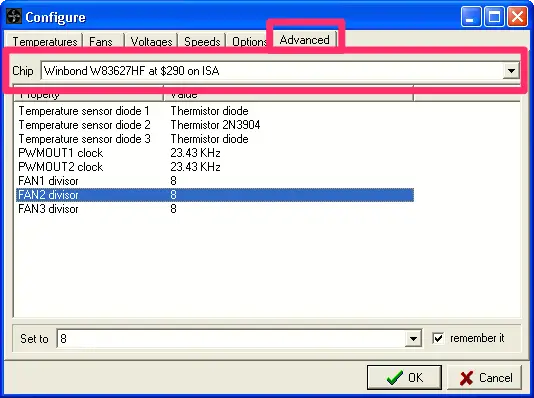
- Let’s focus on adjusting your fans. Click on the “configure” button. When a new window pops up click on the “Advanced” tab and find the “Chip” dropdown where you pick the one matches yours.
- The next step is to set all PWM (“Pulse Width Modulation”) options to “Manual”Now go to the “Configure” > “Speeds” tab to set minimum and maximum RPM for your fans
- Click the “Fan Control” tab where you can test your new settings. Please remember to check the option to save your settings before you close
- The very last step is to set your CPU temperature monitor. Go to the “Temperature” tab and set your “desired” temperature and “warning” temperature.
- All done! Congrats!
#2: HW Monitor

HWMonitor is a free program that monitors the performance of all of your hardware components. It can tell you whether your computer is overheating or running normally, among other things.
One of the most significant advantages of this program is that it’s frequently updated (every 3-4 months). It’s also lightweight that which means that it’s barely perceptible to your system. It’s free but has a more powerful PRO version too. Yet, for a purpose of managing your computer fans, it should be more than enough.
Best HWMonitor features:
- Simple and easy to use user interface
- Suitable for beginners
- You can export the data to .txt file
- Comes in 32 and 64 bits version
- Supports most common sensor chips (such as ITE® IT87 series, most Winbond® ICs etc)
#3: MSI Afterburner

This piece of software was created with people who love overclocking and do it often but can be used by everyone. It is a very good choice for beginners because all you need to do is to drag a control. It also features a real-time display where you will see how your PC temperature fluctuates.
What’s really interesting is that you can save up to 5 profiles that will store your preferred settings. You have them handy whether you are gaming, working on doing anything else.
#4: Argus Monitor
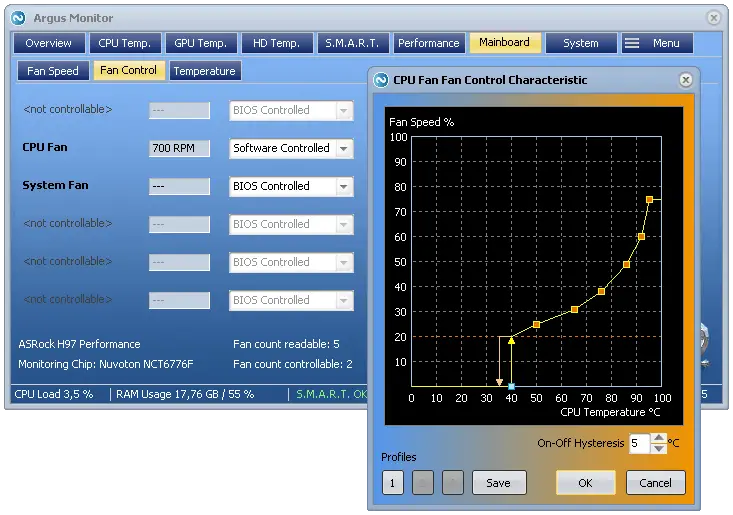
The Argus Monitor is yet another app that will help you to change CPU fan speed without BIOS. It is a powerful and easy-to-use program that can show you all of your system’s sensor data like HDD temps, GPU temperature as well as CPU temperatures.
The “Argus monitor” has been designed for anyone who needs minimalistic yet detailed information about what’s happening inside their computer. The intuitive interface makes usage of this tool and all its functions incredibly easy.
It also has an impressive fan control function for those who want to tweak their fans.
PS Good news: it comes with dark mode too
#5: Open Hardware Monitor
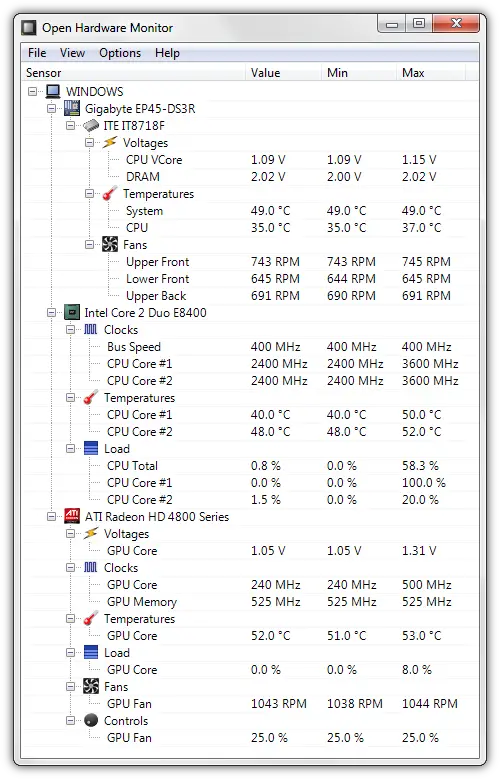
The OHM (Open Hardware Monitor) tool is simple to operate and may be used to show any of your system details in both the system tray and a basic on-screen gadget. It’s also an open-source program with no advertising or bloatware included! It not only allows you to adjust your fans but also keeps an eye on your CPU and GPU temperatures since you never know when something may go wrong!
#6: Corsair Link 4
The Corsair Link 4 software is a must-have for PC enthusiasts. It not only monitors your system’s temperature. It also allows you to control fan speeds and monitor important information such as HDD or CPU load! This customizable monitoring tool works perfectly on more than just Hydro Series Liquid Computing Coolers from corsair. It can be used with any other cooling solution too.
#7: EasyTune 5 Software
EasyTune 5 is a great program for controlling your computer’s fans. It has options to manage both the CPU and case fan, as well as laptop and HDD ones! The interface of this software couldn’t be easier. Just choose which device you want it run on from within Easy Tune 5 itself before clicking “start control now” or “schedule task”.
Easy tune 5 allows users not only to overclock their own processors. It also adjusts speeds among other features such as switching off lights when inactive etc.
Easy Tune makes sure all components stay cool during busy sessions through smart scheduling scripts.
#8: Zotac FIRESTORM
Zotac FIRESTORM is an easy-to-use program that can serve as a fan speed controller and overclock your graphics card. They’re no stranger in the industry, having sold both gaming desktops and graphics cards before. Firestorm comes with powerful features. The most popular ones are RGB lights customization and monitoring performance. It’s easy to change fans’ speed thanks to a very friendly user interface.
#9: SMC Fan Control [Best Fan Control Software for Mac]
So you have a Mac but feel like it’s overheating all the time? You should download SMC fan control for mac and increase that minimal speed. This free tool helps you make sure your computer does not overheat and get damaged. You can use it to set different speeds for your computer’s fans, so they are at the right level no matter what you are using it for.
#10: TPFan Control
TPFan Control software programs can work marvelously in controlling the fan speed on laptops and distribute released heat evenly to prevent thermal shutdown.
Change the CPU Fan Speed Without BIOS By Buying External Fan Controllers
If you want to know how to change CPU fan speed without BIOS but for some reason, you don’t want to do it through the app, then an external fan controller is a way forward. You can monitor and adjust the speeds of all installed fans manually with ease!
Be aware that there’s more than one factor before deciding on what type of PC cooling system best suits your needs. Make sure you check all the necessary things like flexibility, efficiency, and noise it makes. You also need to decide whether you need a 3-pin or 4-pin header.
There are many fan controllers on the market, but when it comes to cooling your computer, nothing beats the efficiency and functionality of Corsair Commander PRO and Noctua.
CORSAIR’s iCUE Commander PRO
CORSAIR’s iCUE Commander PRO turns your case into an intelligent, two-in-one. It not only powers 6 DC or PWM fans with voltage control but can also run at zero RPM for total silence! 4 repositionable temperature sensors allow you to accurately monitor temperatures throughout the system through CORSAIR software.
The only downside is that the installation instruction is not clear for everyone. It’s better to follow the video below for the installation guide:
Noctua
Noctua Fan controller is the perfect solution for those who want to manually adjust their fan speeds without completely disabling automatic motherboard speed control.
This highly flexible device (you can connect up to 3 fans at the same time) works as either an additional manual fan speed reducer or in tandem with your computer’s built-in ventilation system – allowing you maximum flexibility when trying out different cooling methods!
The “no stop” mode prevents the fan from reaching below 300rpm to avoid BIOS errors.
How To Change CPU Fan Speed Without BIOS – Some Questions You May Have On The Topic

There’s no ideal RPM but in general – case and CPU fans do good when they operate between 1200-1500RPM (or approx 70-75% maximum speed).
The type of fan you use will depend on a number of factors, including where it is being used and what noise level can be heard. If the computer processor gets too hot it may need stronger cooling. Most systems have sensors that adjust themselves automatically based on temperature. In most cases, there’s no need for constant adjustments with RPMs as well!
If your computer fans are running fast it means that your CPU temperature is high and your computer tries to cool itself down. There are 3 main reasons for that behavior:
– You are doing some CPU intensive operations like gaming or video editing
– Clogged air vents and dust are making your CPU to be hotter than it should
– You have a malware
You can tell if your CPU fan is working properly by listening to the noise and checking them visually. Computer fans are quiet especially when they idle, but there are plenty of apps (such as SpeedFan) that will allow you to manipulate fan speed.
If you want to change your CPU fan speed manually then you can do so through BIOS. You need to restart your computer. When you see a notification saying “Press [some key] to enter SETUP” press and hold this key. Once you are in go to “Hardware monitor” and find “CPU fans” and click the “OK” button. Adjust the speed of your fans as you like (the default setting is probably automatic fan control)
Summary
Hopefully, now you know how to change CPU fan speed without BIOS. No matter whether you are using Microsoft Windows or Mac there are a few ways to change it. If you need to do this on a frequent basis, I recommend picking up an app or software. It’s probably the easiest way to manage your fans’ speed if you use your computer for multiple purposes.

